
It's a round watch with a touch screen and a sporty look. I love it so far!
About This Tutorial
In this tutorial we will see how you can extend an existing Android application for handheld/smartphone by providing a dedicated interface for an Android Wear device
If you are starting from scratch the development website from Google might be a better resource.
Unfortunately it lacks a lot of information, as it never gives you the generated code you need if you are adapting an existing app.
Unfortunately it lacks a lot of information, as it never gives you the generated code you need if you are adapting an existing app.
I already have an app for the phone that sends an HTTP request to a web service which eventually opens the garage at my house. I want to be able to trigger this action from the watch.
So we'll have this:
Bluetooth WiFi/HTTP
[watch] ------------> [phone] --------------> [web service]
Resources
The Google Developers website contains the info you need regarding other uses of the APIs, the documentation of the layouts and so on. Make sure to check it out.
Tools
Make sure you have all these tools:
- An Android Wear device. The emulator just isn't enough I think, but YMMV.
- An Android phone
- The Android Wear app on your phone
- Recent build tools and SDK. API 20 features Android 4.4W. W stands for "Wear". The LG G Watch R runs 4.4W2.
- Gradle 2.1 or later. I unzipped the thing somewhere and added the "bin" folder in my PATH.
Don't use the wrapper that comes with your IDE or the outdated version from your package manager on Linux. - A terminal emulator. I use "Console 2" on Windows
You can use Android Studio or Eclipse with the ADT and Gradle plugins. Actually you don't even need an IDE for this tutorial. I will show you how to use ADB and Gradle from the command-line because it requires no configuration, but you should be able to build and deploy the project from your favourite IDE.
I did all this on Ubuntu Linux 14.04.3 LTS, but it should work just the same on Windows and OS X.
If you've got a Samsung phone, you will need to download the Windows drivers from the Samsung website.
I did all this on Ubuntu Linux 14.04.3 LTS, but it should work just the same on Windows and OS X.
If you've got a Samsung phone, you will need to download the Windows drivers from the Samsung website.
Step 1: Check your installation
Fire up the command line and make sure everything's working properly.adb devices should list your phone.
gradle should say "Welcome to Gradle 2.1."
If they don't, make sure they are in your path.
Step 2: Enable debugging on your watch
By the way, when the folks at Google use the word "debugging" they really mean "Allow ADB to communicate with an Android device".ADB (Android Debug Bridge) is also what you use for reading logs, installing, uninstalling, and starting apps from your computer.
Here's how you communicate with a watch that doesn't have a USB connector:
Bluetooth USB
[watch] ------------> [phone] -------> [computer]
Follow these steps to setup the whole thing.
Note the TCP/IP connection over Bluetooth and USB is very unstable.
In the next steps we will install the app on the "wearable". You will see more often than not, the watch is no longer "online" or the installation won't work because of an error.
In that case here's my advice to restart a broken connection:
1. adb kill-server
2. adb forward tcp:4444 localabstract:/adb-hub
3. adb connect localhost:4444
4. wait 2 seconds (I know some people will automate this in a script ;-))
5. adb devices (make sure the wearable is listed)
Step 3: Use Gradle in your project
I tried using the legacy build system of IntellIJ IDEA for Android projects but I realized it's a big waste of time and we will all need to use Gradle eventually for lots of reason, the main one being that it is the standard imposed by Google.
They still support non-gradle builds for now, but it probably won't last...
So make sure your project already compiles with Gradle.
If you are planning to write a smartphone AND wear application as we are going to do, you can't just migrate to Gradle by keeping your existing directory structure (which is explained here).
You need to use the standard directory structure for a Gradle "multi-project". Remember Gradle believes in "convention over configuration", so your build files are very short (unlike Maven) because you will be using the default configuration.
Step 4 : Main Project structure
Remember my "Garage Opener" application? Here's the new structure:
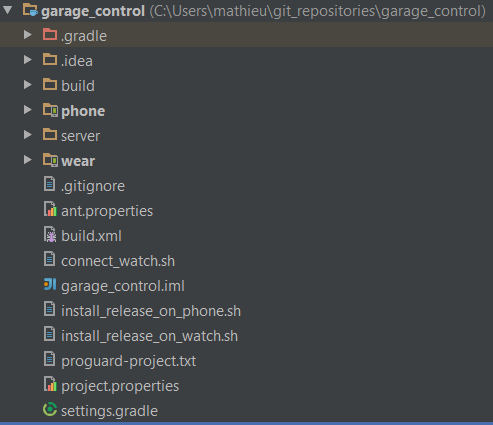
You can see this project contains two modules: phone and wear.
They contain the code and resources respectively for the smartphone and the watch.
Note the smartphone APK will package the watch APK so that when users install your phone app the watch app is automatically installed on the watch.
This is not my choice, it's what Google decided. But when developing we will be able to install the watch APK directly on the watch. Your only way to uninstall an app from the watch is by using ADB. You can't do it from the watch or the phone.
The main project is a "multi-project", that's why it doesn't contain a build file (build.gradle).
Instead there only is one file you need: settings.gradle.
Here's the content of the settings.gradle file:
include 'phone', 'wear'
We could have had two completely different projects and run gradle from there. Each builds his APK file and runs on the appropriate device. That multiproject thing is needed only because the phone app includes the wear APK.
As a matter of fact, you should not have dependencies between modules!
Step 5 : Handheld module structure
Here's the content of the phone module:

It contains the Java source code for the activities as well as the resources (images, layouts, translations) as in any project.
It also contains the AndroidManifest.xml file (in the src/main folder).
Mine is like this:
That is the actual content of my file. I only put it to be exhaustive. You should actually use the one you already have. I will explain later why the service is needed.
One important thing though: the package name needs to be the same in both AndroidManifest.xml files. (We will have one for the watch as well.)
This is the content of the build.gradle file:
The things that matter here:
- You need to compile with at least SDK 20 that includes Android 4.4W (Wear edition).
- Use the latest version of the build tools.
When working in a team I advise all people to use the same version. - The applicationId must be the same in both modules.
- The phone doesn't need to run the latest flavour of Android. For instance here the phone app will run from Android 4.2 (API 17) to Android 5.0 (API 21).
- Uncomment the middle section to sign the release APK. This APK is generated with the "assembleRelease" task from Gradle, as we will see later.
NOTE: You should not put the passwords of the keystore and the key (and probably not even the keystore itself) on your VCS. It is possible to have this information in another (untracked) file, but for the sake of simplicity I didn't do it here. (because to be honest, it's painfully hard to do and not well-integrated yet. I hope they will make it a built-in option some day.) - Use repositories instead of JARs copied in the libs/ folder whenever possible.
(Just so you know, in this project there are no JARs.)
If you are in a team you probably want to have your own repository to share binaries other developers will use in other projects. - My phone app communicates with the wear app (that doesn't need to be the case), that's why there is a dependency to Play Services Wearable. You don't necessarily need that.
- The weapApp tells Gradle to package the wear app inside the phone app.
- Note the semi-colon.
Step 6 : Wear module structure
And here's the content of the wear module:

There's the activity and the resources that will be displayed on the watch. Note it's probably silly to put the folders for high resolution drawables.
Again, the AndroidManifest.xml:
To be honest I'm not so sure about the parameters of the .WearActivity, but they worked.
You can see I also included an activity that's not mine. We will start it from our application, that's why it's needed. It's actually the one displaying a green circle to show an action was successful.
The meta-data thing is needed because we will communicate with the phone through the Google Services APIs (don't ask me why).
I am now noticing no permissions are required. I do know you can have uses-feature though, for instance if your app relies on the pedometer or other hardware bits the watch might or might not have.
As I said earlier, the package name needs to be the same in both modules.
And here's the content of the build.gradle file:
It should look the same as the phone app for the most part, except for:
If your IDE is shouting at you right now, it's because you need to "Sync" the project (in Android Studio) because it has to read the build.gradle file to know how the android.support.wearable package is defined. Note Android Studio / IntelliJ IDEA will propose you to solve the problem by adding the appropriate JAR to your classpath. BAD IDEA! (No pun intended.) The idea won't complain anymore but the project will not compile with Gradle. I had to do both.
Now, about the layou tfile, you can see the stub takes all the space available (because of the match_parent value).
The tools namespace is only for Android Studio so the Preview is displayed correctly. You don't need the related attributes.
What you absolutely need though is the app: attributes. This tells the stub where to find the actual layout files.
round_activity_wear.xml (and rect_activity_wear.xml as a matter of fact, but I couldn't really try it on a real watch):
This layout is really not something to take as an inspiration. I show it to you for exhaustivity but I implore you not to use all these hardcoded widths and heights.
It's not even centered vertically (although if you read the code it should, right?!)
I can't give you the images for the arrows for copyright reasons. Just know these are transparent 96x96 PNG files.
The BoxInsetLayout allows you to display something square on a round screen. You can use this trick if you are lazy and don't want to design a specific layout for round screens.
- The minSdkVersion must be at least 20, because that's the API release number for Android 4.4W (Wear edition).
- The targetSdkVersion doesn't need to be the same, must be equal or greater than minSdkVersion. That goes for all Android applications for all devices.
- versionCode and versionName is not the version of a framework but the version numbers for your application.
- There is a dependency to android.support:wearable that you must include. The other one is only needed if you intend to communicate with the phone from the watch (or the other way around).
Step 7 : Watch app layout
Let's start with what the application will look like on the watch:


Incredibly simple, right? It must be. Don't try to do too much with a wear app. Be more minimalist than the most minimalist person in the world.As a matter of fact Google has a whole page of guidelines to design wear apps.I prefer round watches, but keep in mind this is Android. There will be plenty of different screens and resolutions and you should design for as much hardware variants as you can.This guide explains you how to design for round and rectangular screens.There will be three files:
- activity_wear.xml
- rect_activity_wear.xml
- round_activity_wear.xml
We never reference the last two from the Java code. The WatchViewStub in the activity_wear.xml layout will choose the right one. That's why it's called a "stub".Here's activity_wear.xml:
If your IDE is shouting at you right now, it's because you need to "Sync" the project (in Android Studio) because it has to read the build.gradle file to know how the android.support.wearable package is defined. Note Android Studio / IntelliJ IDEA will propose you to solve the problem by adding the appropriate JAR to your classpath. BAD IDEA! (No pun intended.) The idea won't complain anymore but the project will not compile with Gradle. I had to do both.- activity_wear.xml
- rect_activity_wear.xml
- round_activity_wear.xml
Now, about the layou tfile, you can see the stub takes all the space available (because of the match_parent value).
The tools namespace is only for Android Studio so the Preview is displayed correctly. You don't need the related attributes.
What you absolutely need though is the app: attributes. This tells the stub where to find the actual layout files.
round_activity_wear.xml (and rect_activity_wear.xml as a matter of fact, but I couldn't really try it on a real watch):
This layout is really not something to take as an inspiration. I show it to you for exhaustivity but I implore you not to use all these hardcoded widths and heights.
It's not even centered vertically (although if you read the code it should, right?!)
I can't give you the images for the arrows for copyright reasons. Just know these are transparent 96x96 PNG files.
The BoxInsetLayout allows you to display something square on a round screen. You can use this trick if you are lazy and don't want to design a specific layout for round screens.
Step 8 : WearActivity / Sending a message to the phone
That's the activity that will run on the watch. Yes, the OS and APIs are the same on all Android devices, for most of them. Watches will have activities. As a matter of fact, watches are even able to run some phone apps unmodified (but the interface won't be really practical or even useable).
Here I will directly include the code to communicate with the phone:
Some of this code is based on the Google tutorial, but unfortunately the folks at Google forgot to include vital pieces of code and I had to figure out myself how to use their libraries.
Let me explain you this code.
In the onCreate() method, we "inflate" the WatchViewStub and attach a Listener to it. This makes it display the round or the rectangular layout. When that layout is inflated, we can do what we would usually do in the onCreate() method. We set the OnClickListeners of the buttons in the OnLayoutInflatedListener.
The sendCmd(String) method will send some data (here a String but it could have been any sequence of bytes) to the phone app.
As it runs network code, we need to enclose that code in an AsyncTask (as in any Android app).
It uses Google's MessageAPI to communicate with the phone. In order to use this API, we need to connect to the Play Services Infrastructure. You can find the code in the getNodes() method.
The getNodes() method lists the Android devices you have associated with your Google account. You should probably filter them to select only your phone I think, but in my case it worked this way.
In onDestroy() we disconnect from the Play Services.
We need to provide an "Activity Path" that acts like a URI. An optional payload (which we use here) can be sent along with the message. The MessageApi sends data asynchronously, but we use the .await() method to make it synchronous again.
When the message could be sent successfully, we start the ConfirmationActivity that all apps can invoke. It's not one of our activities. The extra message is the text that appears below the green OK image. You could print "Message Sent" instead.
As a matter of fact you should rather put a translation in the strings.xml files, and reference it with
getString(R.string.my_text).
As a matter of fact you should rather put a translation in the strings.xml files, and reference it with
getString(R.string.my_text).
Speaking of things you "should rather do", the best practice is to put a Confirmation Timer as explained here.
I wanted to do it but again, the explanations from Google are lacking and it didn't work.
Step 9 : Receiving a message on the phone
Maybe now you should be able to figure out why we had dependencies to Play Services and what were the service definition in the AndroidManifest.xml in the phone module was for.
Let's see that again:
The phone will receive the message using a Service.
We have to create a service. Here I named it "AndroidWearMessageListenerService":
First thing you should see is that the "Activity Path" has to match in the wear and the phone apps.
To my understanding, you can choose it freely.
Remember our message came along with some optional data that can be any sequence of bytes. Here I sent an ASCII String. That's why we need the constructor from String() that, just so you know, must never be used like this: new String("some string").
I purposefully don't handle NullPointerExceptions.
Step 10 : Compile the project
Go to your main project folder (the one with the settings.gradle file) and run:
gradle installRelease
This will compile the project, package it and install it on the phone and the watch.
(Note you might have to try installDebug if you didn't configure the release config in Gradle build files).
Unfortunately, Gradle could not install it on the watch because it takes a bit of time and Gradle ignores the Timeout that you have set in DDMS. See this post.
Workaround:
adb -e install -r wear/build/outputs/apk/wear-release.apk
This takes about 40 seconds (!) on my setup.
If you run an emulator at the same time you need to provided the host and port (localhost:4444) as well, as explained in the Google tutorial.
If you will be doing this, then I advise to run the assembleRelease task to save a little time when you don't need to install the app on the phone because it didn't change.
If you will be doing this, then I advise to run the assembleRelease task to save a little time when you don't need to install the app on the phone because it didn't change.
To install the phone app you can use this:
adb -s 123456e1 install -r phone/build/outputs/apk/phone-release.apk
where 123456e1 is the identifier you can find with adb devices.
Step 11 : Enjoy!
If everything went fine, you now have a nice app to show to your friends and be prepared to do the coolest things with your watch!
Step 12 : Improve and share
Improve the app by adding the Confirmation Timer and tell use how you managed to do it.
Share any other tricks you found, even if you think everybody knows them.
You might also want to handle errors (could not connect to phone, could not connect to web service, web service returned an error) and so on...
You might also want to handle errors (could not connect to phone, could not connect to web service, web service returned an error) and so on...
No comments:
Post a Comment